One of the standout features of the Steam Deck is its versatile controls, ranging from face buttons to joysticks to touch controls. However, nothing beats the precision of a full-size keyboard and mouse, and the good news is that you can easily connect them to the Steam Deck. It supports both wired and wireless connections, although a USB hub may be necessary for a USB connection.
Here’s how you can set up a wireless keyboard or mouse on the Steam Deck, along with the necessary settings to optimize your performance:
How to connect a wireless keyboard or mouse to the Steam Deck
Step 1: Ensure you have a compatible wireless keyboard and mouse. With Bluetooth 5.0 support, the Steam Deck can work seamlessly with various Bluetooth devices. If you need recommendations for a new Bluetooth keyboard or mouse, check out our guides to the best wireless keyboards and mice.
Step 2: Make sure your keyboard and mouse are fully charged, powered on, and ready to pair with your Steam Deck. If they have pairing buttons, make sure they are prepared for the pairing process.
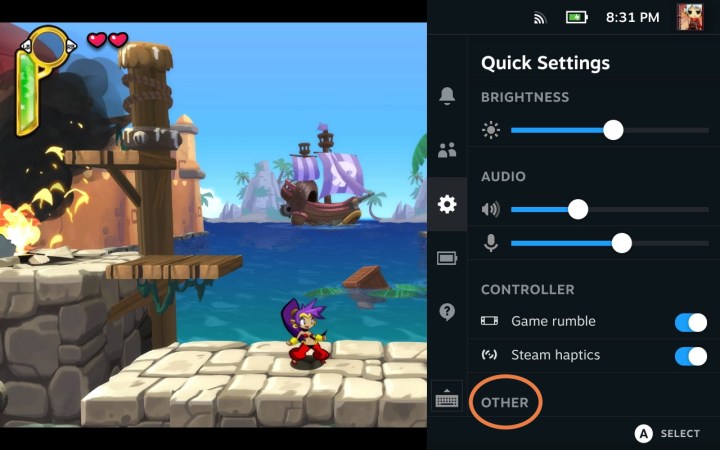
Step 3: You can connect your keyboard and mouse without switching to desktop mode. Simply press the “QAM” button (the “…” button on the bottom right of the Deck) to access the right-side menu. From there, navigate to the cog icon to access the Quick settings menu.

Step 4: In the Quick settings menu, select the “Other” option at the bottom. This will open a Bluetooth menu where you can enable Bluetooth if it’s not already turned on.
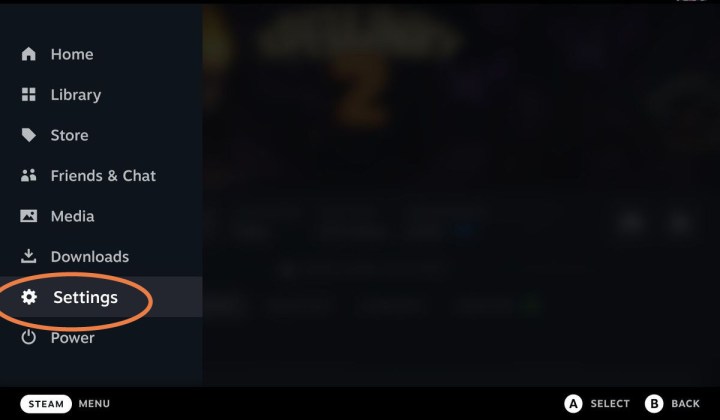
Step 5: Exit the Quick settings menu and press the primary “Steam” button to access the options menu. Navigate to “Settings” in the menu.

Step 6: Select “Bluetooth” from the left-side menu in the Settings menu. Ensure Bluetooth is enabled and look for your keyboard and mouse under “Available to pair.” Pair them with your Steam Deck when they appear.
It may take a few seconds for each device to pair and connect.
Step 7: If you intend to play a game with a keyboard and mouse, check the controller layout. While the Steam Deck will attempt to switch to an external device layout when connected, it may not always be optimal for a keyboard and mouse setup.
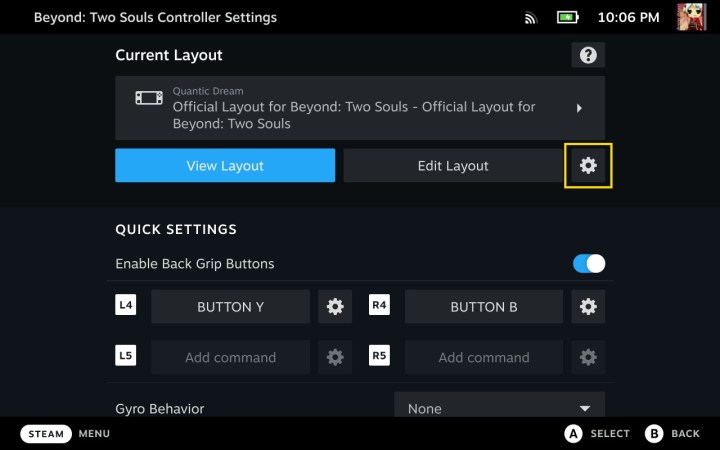
Locate the game you wish to play on the Steam Deck and select the “Controller” icon to access the controller settings. Check the current layout and switch to a keyboard and mouse layout if available.

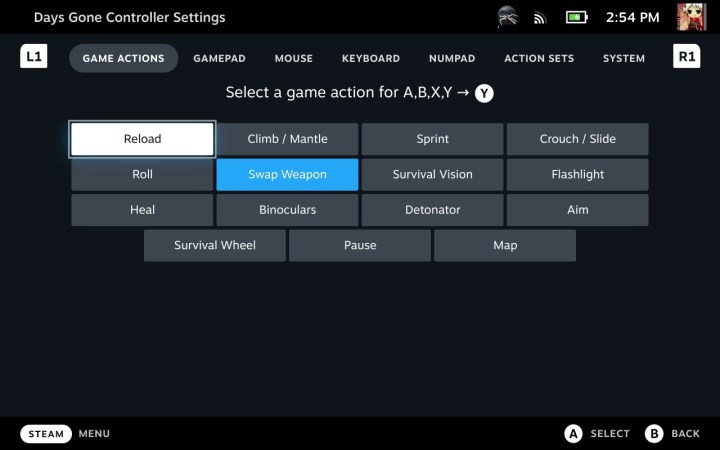
Step 8: If there isn’t a pre-set keyboard and mouse layout, you can create your own by editing the layout and configuring the commands in the “Mouse” and “Keyboard” sections. Keep in mind that keyboard and mouse controls may vary across different games, so customizing the layout can enhance your experience. Ensure your preferred layout remains active each time you start the game.

Step 9: Note: If you are already in Desktop mode, you can access these options directly from the Desktop menu in the bottom right corner of the screen. However, setting up your keyboard and mouse before switching to Desktop mode is typically more convenient.
How to connect a wired keyboard and mouse to the Steam Deck
Connecting a wired keyboard and mouse to the Steam Deck requires a Steam Deck Dock or a USB hub, and the process is straightforward:
Step 1: Connect your Steam Deck to the Steam Deck Dock or a compatible USB-C hub.
Step 2: Use the USB cable to connect your keyboard and/or mouse to the Steam Deck Dock or USB Hub. If your devices require a different USB connection, you can use a USB adapter.
Step 3: Your keyboard and mouse should be recognized by the Steam Deck and function properly.
If you plan to play specific games on the Steam Deck with a keyboard and mouse, be sure to check their compatibility before getting started.
Editors’ Recommendations


