Counter-Strike is well-known for its high level of customization, allowing players to enhance their gaming experience. Utilizing CS2 autoexec commands is a great way to optimize your gameplay and gain that extra edge. If you haven’t started using them yet, you’re missing out!
For those unfamiliar with CS2 autoexec commands, we’ll guide you through what they are, how to create them, and where you can find commands to include in your own setup.
Understanding CS2 Autoexec Commands
Credit: Daniel Morris
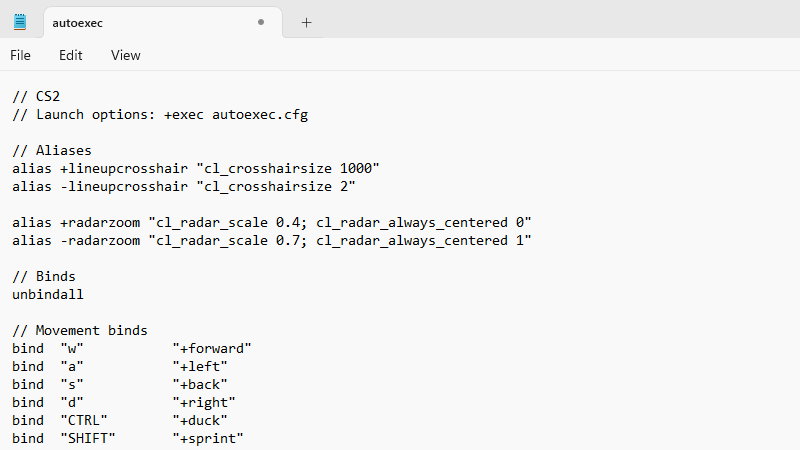
CS2 autoexecs are .cfg files that store and automatically execute a series of console commands based on the user’s preferences. This eliminates the need to input these commands each time the game is launched.
While autoexecs are commonly used in professional gameplay, casual players can also benefit greatly from them. By creating a CS2 autoexec, you can easily transfer your settings between different PCs, ensuring a consistent experience across all devices.
Creating an Autoexec in CS2

Credit: Daniel Morris
To create an autoexec in CS2, follow these simple steps:
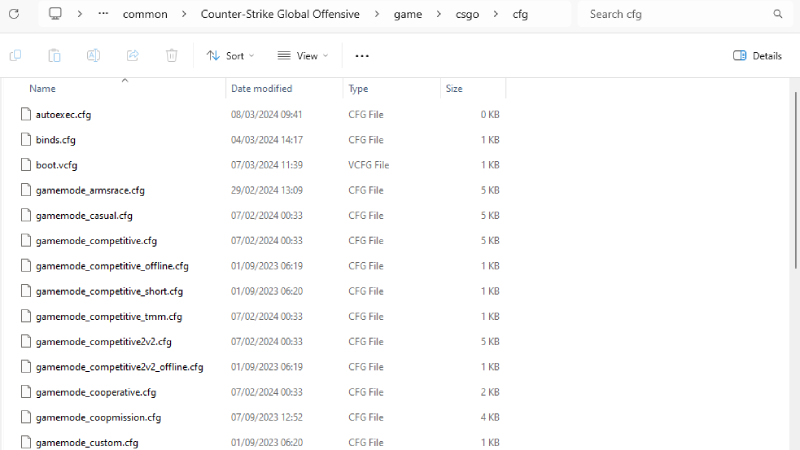
- Open the following file location: “C:\Program Files (x86)\Steam\steamapps\common\Counter-Strike Global Offensive\game\csgo\cfg”.
- Create a new text file in this folder named “autoexec.cfg”.
- Open the cfg file using Notepad.
- Add any desired commands to the CS2 autoexec, save, and exit.
- Right-click CS2 in your Steam Library, go to “Properties,” and find the “Launch Options” box in the “General” tab.
- In the box, enter “+exec autoexec.cfg”.
Once the file is in the correct location as specified above, it will load every time you launch the game. You won’t have to repeatedly input these settings when opening CS2. But what commands can you include in a CS2 autoexec? Let’s explore.
CS2 Autoexec Commands

Credit: Daniel Morris
CS2 autoexec settings are essentially console commands that you want to run consistently without the hassle of entering them every time you play. Whether it’s jump throw binds or other preferences, autoexecs offer personalization. You can set movement binds, buy menu binds, viewmodel configurations, and more. Here’s an example of commands for a CS2 autoexec:
// Grenade Buy Menu Binds
bind “e” “+lineupcrosshair; buy flashbang; slot7”
bind “v” “+lineupcrosshair; buy incgrenade; slot10”
bind “c” “+lineupcrosshair; buy smokegrenade; slot8”
bind “x” “buy hegrenade; slot6” bind “z” “buy decoy; slot9”
// UI Binds
…
For a comprehensive list of commands suitable for an autoexec, refer to our detailed CS2 console commands guide. Any command included in the guide can be incorporated into your CS2 autoexec settings.
Troubleshooting CS2 Autoexec Issues
If you encounter problems with your CS2 autoexec not working, it may be due to placing the file in the incorrect folder. Ensure it is in the “cfg” folder and not the previous “CSGO” folder to resolve this issue.
Alternatively, if your autoexec file was not saved with a .cfg extension, open it in Notepad, select “Save As,” and ensure it is saved as “All Files” rather than a Text Document. Following these steps should rectify common CS2 autoexec problems.


